How to Prepare Your Yard for Sewer Line Replacement
Sewer line replacement is a significant undertaking that requires careful planning and preparation. Whether your sewer line has aged, been damaged by tree roots, or collapsed due to shifting soil, replacing it is crucial for maintaining a functional plumbing system. However, this process can be disruptive, especially to your yard and landscaping. Proper preparation can minimize damage, reduce stress, and ensure a smoother replacement process. This guide will walk you through everything you need to do to get your yard ready for sewer line replacement, from assessing the problem to restoring your landscape afterward.
"The Environmental Impact of Sewer Line Replacement"
Understanding Why Sewer Line Replacement is Necessary
Before diving into the preparation process, it’s essential to understand why sewer line replacement might be necessary. Common reasons include:
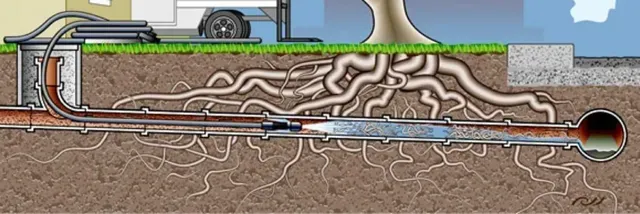
Tree Root Intrusion: Over time, tree roots can grow into sewer pipes, causing blockages and even structural damage.
Aging Pipes: Old pipes, particularly those made of clay or cast iron, deteriorate and eventually fail.
Soil Shifting and Ground Movement: Earthquakes, heavy rains, or construction nearby can cause soil to shift, leading to pipe misalignment or breakage.
Recurring Blockages: If you frequently experience slow drains, backups, or foul odors, it may indicate a failing sewer line.
Step 1: Consulting a Professional Plumber
The first step in preparing your yard is to consult a professional plumber or sewer specialist. They will inspect the sewer line using specialized cameras to assess the extent of the damage. Based on their findings, they will recommend either full replacement or partial repairs. Additionally, they can advise on the best replacement methods, such as traditional trenching or trenchless pipe replacement, which minimizes yard disruption.
Step 2: Identifying Utility Lines
Before any digging begins, it is critical to identify the location of underground utility lines. Contact your local utility company to mark gas, water, electrical, and cable lines. This step prevents accidental damage, ensures safety, and helps the contractor determine the best excavation path.
Step 3: Clearing the Work Area
Since sewer line replacement often involves excavation, you’ll need to clear the area of obstacles. This includes:
Removing Outdoor Furniture and Decorations: Move patio furniture, garden statues, planters, and any other decorative elements that might be in the way.
Protecting Landscaping Features: If possible, temporarily relocate shrubs, flowers, or small trees to prevent damage.
Creating a Path for Equipment: Ensure there’s enough space for heavy machinery to access the site without causing additional damage to your yard.
Step 4: Preparing for Temporary Disruptions
Sewer line replacement can take several days, and during this period, you may experience disruptions to water use. Consider:
Arranging Alternative Bathroom Facilities: If water will be shut off, plan for alternate restroom solutions such as using a neighbor’s bathroom or renting a portable toilet.
Informing Household Members: Make sure everyone in your home understands the expected timeline and any necessary adjustments to their routine.
Preparing for Noise and Dust: Excavation work is noisy and can kick up dust and debris. Cover nearby outdoor furniture and plan for some inconvenience.
Step 5: Managing Soil and Excavation Waste
Excavation generates a large amount of displaced soil, which can take up considerable space in your yard. Work with your contractor to:
Designate a temporary holding area for excavated dirt.
Discuss proper disposal or reuse of the soil for landscaping after the replacement is complete.
Plan for ground stabilization if the soil becomes uneven post-installation.
Step 6: Protecting Nearby Structures
If the sewer line runs close to your home’s foundation, driveway, or patio, take steps to protect these structures. Contractors may use shoring methods to prevent soil collapse, but you should also:
Move fragile items inside the home that could be disturbed by vibrations.
Inspect fences and walls near the excavation site for stability.
Discuss damage mitigation strategies with your contractor.
Step 7: Restoring Your Yard After Replacement
Once the new sewer line is installed, restoring your yard is the final step. Depending on the extent of excavation, this process may involve:
Refilling and Leveling the Excavated Area: Ensure the soil is properly compacted to prevent future settling.
Replanting Grass and Plants: If the lawn or garden was disrupted, reseeding or replanting will be necessary.
Repairing Hardscaping Features: Patios, walkways, or driveways may need repair if they were affected during the replacement.
Conclusion
Sewer line replacement is a complex but necessary process that can temporarily disrupt your yard. However, with proper preparation—consulting professionals, identifying utility lines, clearing the work area, planning for disruptions, and restoring your landscape—you can ensure a smoother experience. Investing time in these preparatory steps will not only minimize damage but also help restore your yard more efficiently once the project is complete. If you suspect sewer line issues, don’t wait—early intervention can prevent costly repairs and extensive property damage.